{metacanonical:http://theprojectjunkie.com/longboards/custom-carbon-fiber-longboard.html}
Custom Carbon Fiber Longboard


Why I Started Making Custom Longboards
I was talking to a friend that owned his own Longboarding company and he asked me to make some carbon fiber longboards for him. After going through a few prototypes I came up with a design that was both light weight and strong enough for down hill racing. He sold/gave away a few boards to some of the riders he sponsored. These racers also helped me figure out what to make. By the time I got a really good productions board out, the business partnership kind of fizzled out and never really materialized- My partner decided to pursue a more "stable" career in medicine. Anyway, to make a long story short I told some boarders on the Silverfish Longboarding Forum that I would do a tutorial on how I make my boards- That was like 8 months ago- So... Sorry for the Delay.
The time wasn't wasted though, I worked out a great design in my head that just needed to get out. This beautiful board is what materialized.
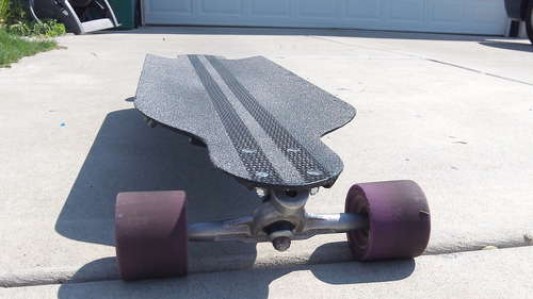
Board Specs
- Board length- 39"
- Board Width- 10"
- Concave- 3/4"
- Wheel base axle to axle- 31.5" to 34"
- Wheel base between inner bolt holes- 29.5" to 32"
- Weight with grip- 2.8 lbs or 1,278 grams
- Weight w/o grip- 2.6 lbs or 1,180 grams
- Flex- super stiff
Making the Plans and Master Template
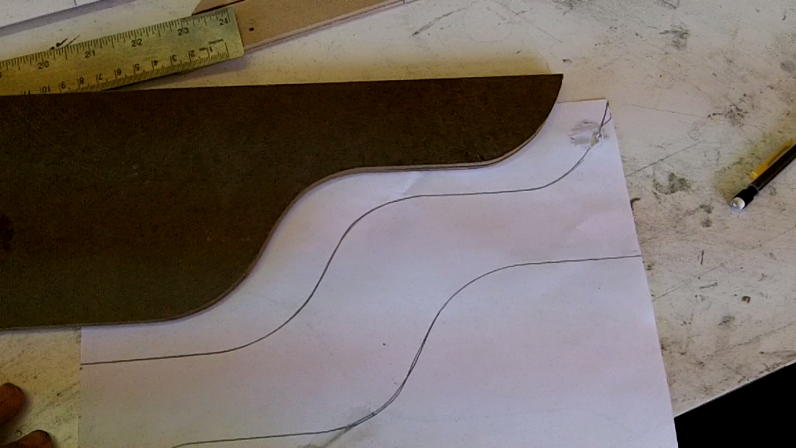
Start buy drawing a master template of how you want your board to look. The template will be the shape of the board and the lines drawn on the template show how the foam core will interact with the board.
.jpg)
Here is a better look at the master template and foam core. You'll want to keep an 1/8" to 1/4" gap between the edge of the board and the foam core- The bottom and top layers of carbon fiber will be laminated together around the perimeter of the board.
.jpg)
I like using folding lines to help me get the template as symmetrical as possible- Think of a mirror image. To make the folding line, I use a razor and then tape the cut back together. Here I have made a folding line down the center of the template so that both the front and back of the board are the same- which really means there is no front and back.
.jpg)
Likewise, I make a folding line down the center of the template lengthwise so that both sides are the same.
.jpg)
Making the Foam Core Template
My board is going to be 10" wide so I need two pieces of 1/8" MDF, Hardboard, Particle board, or Handy board that is at least half of that or 5." The size of your template boards will depend on how big you are making your longboard. Just remember that the template boards should be cut at least half as wide as your longboard is going to be; and in my case .5" on top of that to account for errors.
.jpg)
Next use 3M's Super 77 spay adhesive and glue the two peices of MDF together.
.jpg)
Once the two boards were together I ran them through the table saw so that one side is flush and straight with each other- If you use a table saw, be careful not to cut too much away.
.jpg)
Hitting the flush edge with a long sanding block (like the one shown below) will ensure the flush side is also straight.
.jpg)
The straight and flush edge of the board will be the center line lengthwise of the foam core template. I fold the master template along it's center line and line it up with the flush edge of the template boards. The piece of tape that you see holding the template is just there to help me trace around the master template.
.jpg)
Now that the master template is drawn onto the boards, create an 1/8" to 1/4" space for the foam core. Note: that the foam core is the smaller of the two drawings and the master template is the larger one. The foam core line is the one closest to my finger.
.jpg)
Here's another look. On this board I am making the space an 1/8" on the sides and about 1/4" on the ends.
.jpg)
I used a jig saw to cut out the foam core's shape but a band saw or something similar will work too. I usually just do a rough cut making sure I don't cross the line into the good side of the template. In other words I leave about a 1/16" excess of waste board on the outside of the templates line to be sanded away later.
.jpg)
Clean up the edges using sanding blocks and a sanding pipe- 60 grit is a good sanding paper to use.
If you are making a symmetrical board like I am, it helps to use a piece of paper to verify the accuracy of the two ends. Line up the template with the corner of a piece of paper, then make the edge of the paper flush with the template. Just trace one side of the template flip it over and trace out the other side. Discrepancies will show up as double lines on your paper. You'll notice that there is a double line where I am pointing. This means that both sides are a bid different. Therefore, I need to do a little more sanding on the offending (Larger) side of the template.
.jpg)
After some corrective sanding to the offending side of the template, both sides are the same. Discrepancies don't really matter that much on the foam core but I think it's good karma to get them close. You'll notice that in the picture below the top trace looks like one line. That indicates that both ends of the template are the same.
This next part is a little confusing to explain so let me show you what we're trying to accomplish. The following picture shows an 1/8" thick piece of G-10 Fiber Glass laminate. This will be used as part of the trucks mount. It will be sandwiched between the top and bottom layers of carbon fiber. In order to make the mount strong enough for riding over, and hitting, bumps this piece of laminate extends into and is recessed into the foam core. I extend this mounting plate 2" into the foam core. If you don't want to use G-10 here you can use a carbon fiber panel.
.jpg)
The foam core's template will need to have the area where the mounting bracket goes removed so that the foam core can be shaped more easily. Here is another picture of what we are trying to accomplish.
.jpg)
OK, so now that you've seen what is going to happen let me explain how to get there.
I used a table saw to cut the template where the mounting plate goes (like in the picture above)- I'm going to call this piece of the template we are removing, the "mounting template." I find it easier to do this cut now before the template is unfolded. I used a coping saw to finish cutting out this mounting template where the mounting plate meets the back edge of the foam core/mounting plate recess.
.jpg)
I didn't take a picture of this next part so bare with me as I try to explain it. Basically take the mounting template and mark where the foam core is going to be cut away (recessed mount) and cut it. Take a look at the picture below it shows where the mounting template is folded, this is the cut just made. Now separate the mounting template from the Super 77 and you should now have 4 pieces to the mounting template. Tape the mounting template together on the top and repeat the entire process on the other end of the board. If I'm still not making sense check out the video on this part of the build.
.jpg)
Now the rest of the template needs to be unglued/separated. If it hasn't already started to un-bond use a razor to get it started.
.jpg)
Using gentle consistent pressure, separate the two template halves.
.jpg)
Tape the two template halves together along it's center line length-wise. Only tape the top side of the template- so you can fold the template up length-wise. It should look a lot like you're master template at this point except a little smaller.
.jpg)
In the picture below you can see that the template has a little more taken away where the foam core gets recessed. This is to compensate for the guide on the trim router. The point I am pointing at in the picture below is the start of where the foam core will be recessed for the mounting plate.
.jpg)
I want you to notice how the mounting template is taped to the foam core template. It folds back like this so that it is out of the way of the router's guard. The final step in building the foam core template is to drill holes for the finishing nails used to secure the template to the foam core while being cut.
.jpg)
Cutting out the Foam Core
Here I am using my router table with a 3/4" cutting face chamfer bit. It has a ball bearing that needs to be adjusted to roll on the template.
.jpg)
Here is a picture of me routing out the foam core using the template and router.
.jpg)
Here is where the mounting template comes in handy. Flip the first flap over and use a razor to cut away the foam core hear on the truck mount recess.
.jpg)
The picture below shows the foam core removed.
Now flip the rest of the mounting template back in preparation for cutting the mounting plate recess.
.jpg)
You can see here that I am using a trim router with a guide and small straight router bit. I've adjusted the height of the router bit so that it cuts down into the foam core 1/8."
.jpg)
The area that I am pointing to is the area that gets routed out. It is where the mounting plate extends into the foam core and is recessed flush.
.jpg)
Here I am just pointing to the piece of tape that was added so that the mounting template can be back and out of the way while routing.
.jpg)
Follow the foam core template and route out the recess.
.jpg)
.jpg)
Check to make sure you've routed enough foam core away so that the mounting plate is flush with the top of the foam core and has a semi snug fit.
Here is another look at how the mounting plate interacts with the foam core.
See how the mounting plate is flush with the top of the foam. This is what you are trying to accomplish.
.jpg)
Here is a handy trick. I put a notch in the end of the mounting plate so that I can find the center line of the board after the carbon fiber layup.
.jpg)
On this board I am going to be integrating some "love handles" or "Death Grips" therefore I need to do some additional routing. Using a 1/2" straight routing bit I set my bit's height to leave an 1/8" of foam core over it's top. I also set the rail/guide so that the groves or channels I am going to cut are in the correct position.
.jpg)
Here is a look at the board after the first cuts.
.jpg)
Now adjust the guide or guard to cut the channel sizes you want. Here is the finished channel cuts. The foam core is now ready for the layup.
.jpg)
You've just gone from paper template to wooden foam core template to foam core. Hang in there there's still a lot left to do. LOL
.jpg)
Preping the Foam core for Carbon Fiber Layup
It's hard to get your carbon fiber around tight corners. Therefore, making some blocks to push them down will help. Make sure when you make your block that you compensate the size of the block to accommodate the carbon fiber. I think I cut my blocks 2-3mm smaller to compensate for the carbon fiber. In other words you don't want your blocks to be tight when trial fitting them in the foam core.
Note: wrapping the blocks in packaging tape will help to get them out after the layup. In the picture below I've got my blocks covered with clear packaging tape and they are ready to go.
.jpg)
I like to Thermal form my foam cores before I do the layup. This will help to prevent breaks of the foam core, where the board gets thin, during the layup. I made this convection oven from a toaster oven I bought at Walmart. It's crude but works really well.
.jpg)
Here is a look at the oven controls. Note: I never plug this thing in unless I am in the shop. LOL
.jpg)
The Divinycell thermal forms pretty good after being heated to 250 deg for 20 min. Here I am using a female mold I made from the master mold- It was a bad part that now works great for thermal forming. You can do this step on your master mold if you want but this female mold is easier to work with plus this system is less prone to causing scratches on the master. I just hold the foam core against the mold with a board until it cools.
.jpg)
The finished board will have a lot more concave than this foam core has but it has enough to prevent it from snapping during the layup.
.jpg)
Carbon Fiber Layup
I created this mold in April of 2010. Since then my computer crashed and I lost some of the pictures to how I made this thing. basically it is just the following from top down:
- Black Tooling Gel coat
- Peelply- Removed after layup cured
- 5 layers of Fiberglass and epoxy- 2 by 2 twill, 6 oz or 8 oz- I can't remember but either will work.
- Expanded Polystyrene- shaped with templates and a hotwire.
- Particle board- Melamine
.jpg)
Here is a look at everything cut and ready to go. Note that the mold has been waxed and PVA has been added.
.jpg)
Carbon Fiber Layup Schedule
For this board I will be using the following layup schedule from the top of the board down (remember the board goes on the mold upside down):
- Plug or male mold
- 1 layer carbon fiber- 6k 11oz 4 harness satin weave (AS4 Standard Modulus)
- 1 layer carbon fiber- 80k 28oz uni (Standard Modulus- I forgot the brand)
- Mounting plates- 1/8" G-10 fiberglass laminate (Roughed up for better bonding)
- Foam Core- 5/8" non-corrugated Divinycell (I believe it's H-80)
- 2 strips of carbon fiber- 1 strip on each of the board's handles- 6k 11oz 4 harness satin weave (AS4 Standard Modulus)
- 1 layer carbon fiber- 80k 28oz uni (Standard Modulus- I forgot the brand)
- 1 layer carbon fiber- 6k 11oz 4 harness satin weave (AS4 Standard Modulus)
- Blocks (With the tape)
- Peelply
- 2 layers of Breather cloth
- vacuum bag- Stretchlon 200 with butyl tape as the sealant.
I am using Resin Research project 2100 system with 2000 CE resin and 2100S (Slow) hardener.
*Important Note on Epoxy HDT*
Something to consider when choosing an epoxy is the Heat Deformation Temperature (HDT). Epoxy HDT is how hot the cured epoxy can get before it starts having a "softening effect" or looses it's stiffness. If you are planning on painting your board black, another dark color, or leaving it nude you may want to consider an epoxy with a higher than standard HDT.
Most common epoxies like West Systems and Resin Research have HDT's in the 125 to 140 deg F range. This temperature can easily be reached by leaving your board in the hot sun or in a hot vehicle. Make sure your board is cooled off before riding it and if you're out all day riding, keep your board in the shade or cover it up when you're not riding it. Otherwise use an epoxy with a higher HDT around 250 deg f to 350 deg f.
Here you can see me wiping epoxy onto the mold with a bondo spreader.
.jpg)
I just did a hand layup for the first layers right onto the mold.
.jpg)
.jpg)
Next the foam core is added along with the mounting plates. You can micro fill the foam core if you want but I've had the micro balloons squeeze through the carbon fiber creating a lousy finish. Now I just wipe epoxy onto the foam prior to the layup. Note: you can't see it here but I've got a couple of marks on the mold that show me the mold's center line. I use these marks to line the carbon fiber and foam core onto the mold. I made a wet prepreg for the final layers because it is hard to do a hand layup on the foam core with the groves (plus I like making prepregs).
.jpg)
I ran out of film memory while filming so you can't see the rest of the layup. But if you follow the layup schedule you'll be just fine. In the picture below you can see everything in the vacuum bag. Note you can see the blocks where it looks whiter under the vacuum bag. I also used two lines coming off the vacuum bag which isn't necessary but I think it helps. On this bag I was pulling 28" HG.
.jpg)
After a good post cure (140 deg F) it's time to remover the vacuum bag, breather, peelply, and blocks.
.jpg)
No joke, I get more excited about pulling parts off and out of molds than I do opening gifts on Christmas day. LOL Sometimes my excitement turns to frustration and orneriness when a part sucks, but this time it was a good day.
.jpg)
Here is a look at the bottom of the board. Note the peelply leaves a mat finish.
.jpg)
Cutting out the Longboard
Remember that little mark that was cut out of the mounting plate? That is the dark spot you can see me pointing at with my thumb.
.jpg)
Here is another look. I used an angle grinder with a diamond cutoff wheel to shape this board. To find the edge of the mounting plate, I cut just outside of the mounting plate and then use a belt sander until I see the plate and mark. Once I see the plate and mark I stop cutting so that I can line the master template up for the board's shape.
.jpg)
A Silver Sharpie is easy to see and recommended for marking and tracing out the board.
.jpg)
See how I've lined up the master template with the mark on the plate? I make sure that there is an equal amount of space between the template and edge of the mounting plate on both sides of the board.
.jpg)
I use an angle grinder, belt sander, orbital sander, sanding block, and sanding pipe to cut out the board. Here I have put on some blue tape so that I don't mar the bottom of the board while sanding.
.jpg)
Putting the Finish on the Board
Some guys will build up the bottom of the board with epoxy, level it with sandpaper and then polish it smooth. That's a lot of work and adds weight. I usually just wipe a layer of epoxy on the board and call it good. However, I've been wanting to try brown pigment with the carbon fiber finish so I tried that here. Unfortunately, I don't really care for the brown color- it didn't really turn out like I had expected- oh well, now I know. I am using Resin Research's 2100 with fast hardener here. I find that brushing the epoxy on can lead to brush hairs getting into your finish, therefore I use a small squeegee to apply the finish.
.jpg)
You can see that the epoxy finish gets rid of the mat finish but the texture left by the peelply is cool and unique (it kind of sparkles). Note: I left the handles without the epoxy finish so I can add some grip to them.
.jpg)
Since this is an experimental board I decide to give this experiment a shot. Here I have Truck bed liner and undercoat.
.jpg)
The under coat will be added to the truck mounts to help eliminate road vibrations and sounds.
.jpg)
The truck bed liner will be used on the handles to provide more grip and resistance to abrasions while turning.
.jpg)
I'll show you the finish later on in the tutorial.
Adding the Deck's Grip
I didn't have any grip tape so I though I'd give the Treadex and epoxy technique a shot. Here I have added two strips of tape, they are strategically placed to avoid grip over the truck mounting bolts/holes and I didn't want to cover up all of the carbon fiber on the top of the deck. After adding the tape I roughed up the deck with some 180 grit sand paper. Note: the tape is put down before sanding to protect the finish from being scratched.
.jpg)
Next I covered the whole board with the fast setting epoxy. I did this out in the sun so that it would gel up on me faster.
.jpg)
Once the epoxy started to get thick from curing, I used a $.99 salt shaker with some Tread Tex to cover the board.
.jpg)
I just sprinkled the whole deck liberally with the Tread Tex.
.jpg)
Before the epoxy set up too much I removed the tape so it wouldn't stick after the cure.
.jpg)
After a couple of hours I checked to see if the epoxy and grip was fully cured and stuck good to the board. I shook off any loose Tread Tex before the final coat.
.jpg)
I added new tape before finishing this deck off with epoxy so that the original finish would remain the same.
.jpg)
Here I am coating the entire deck with the fast epoxy. For this I am using a cheap paint brush. You just want enough epoxy that it coats the Tread Tex without filling it in too much.
.jpg)
.jpg)
After adding the last of the epoxy I removed the masking tape from the board before it fully cured.
.jpg)
Here is what the board looks like after applying all of the finishes. You can see the brown a bit better in this pic.
.jpg)
The grip came out looking great.
.jpg)
I was hoping that the weave would show through the grip, which it did. You can make out the weave pattern when the light hits the board just right.
.jpg)
With grip the board comes out to 2.8 lbs!
.jpg)
Here is a look at the weight in grams 1278!
.jpg)
Mounding the Trucks
Using a pair of Randal 180s I marked out the bolt holes onto the master template.
.jpg)
I then used a pointed object to transfer the bolt holes' centers to the longboard. You'll notice that there are two sets of holes here, this is to distinguish between a long and short wheel base. Since this is a prototype board (with the handles, groves and etc.) I wanted to make sure it was going to be strong enough for racing, so I place the wheels as far apart as possible making it more vulnerable to failure.
.jpg)
I've used both finish washers and counter sinks on these types of boards with good success. Just choose which look you like better and go with it. I like the counter sink look better so I went with that. I also used a drill press to drill the holes. It's a lot easier to use a drill press than a normal hand-held one because it doesn't move the hole on you as much.
.jpg)
.jpg)
Here is a look at the finished board. It turned out looking great.
.jpg)
.jpg)
Flex testing
This is me hoping up and down on the center of the longboard with one foot. You can't see it but my foot is not touching the board- I'm about a 1/2" off the deck.
.jpg)
I captured this photo when the board was at it's lowest point after jumping on it with one foot. It flexes about 1/8" to 1/4." Note: When I took this I weighed in at 205 lbs.
.jpg)
Final Thoughts
The truth is I wouldn't consider myself a "real" longboarder- though, I can do it a little I'm no good at it. So I asked my freind Kevin Winzeler, who is a professional sports and action photographer, if he new anybody that would test this board out for me. It just so happens that Kevin's brother Randy is a boarder and he accepted the challenge. Randy mostly does "Sliding" but said he'd do his best to go fast too. Both Randy and Kevin went to Park City Utah to bomb some hills and Kevin came back with some awesome Pictures.
If you want to see more of Keven's portfolio or see some more awesome longboarding pictures Check out his site: Kevin Winzeler Photography
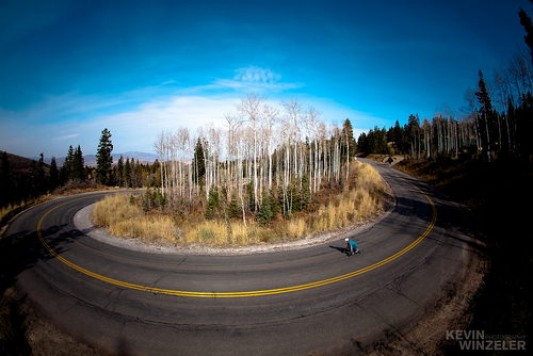


Randy normally rides a Loaded and gave me a great and fair review of this board.
"I have a bamboo based board by the brand Loaded, So it is quite opposite of your board as far as flex and width but same wheel base. At first It was hard to get used to the stiff board, and raised sides but on the long hills I really started to like how stable it felt at high speeds, high speeds for me are around 35-50mph, so not tooo crazy but on the same road I ride quite a bit I felt more in control at those speeds than on my Loaded board."
Randy goes on to tell me that he perfers his Loaded for freeriding and sliding but thinks this board is pretty well designed for downhill racing. Of coarse he'd change a few things if he had a custome one built for himself but then again what longboarder wouldn't?
It's good to hear that this board performs well for what it was designed for; so I guess now I need to find someone else that likes to goes super fast 50+ mph to campare this to other downhill boards. With that said, I would love for a pro to ride this thing and let me know what they think. If you're in the Northern Utah area and want to take this board for a test drive let me know and I'll try to get this beauty into your hands to test out. Just leave me a comment or email me and I'll get in-touch with you.