Ruger 10/22 Trigger Job or Trigger Modification
If your careful and test your rifle out thoroughly before loading it, you should be just fine with this modification. However I do want you to be aware that there are some risks if you're not careful- The safety may not work and you may experience miss fires. If you stay around the 3-4 lb pull weight you'll be fine but if you're going for a hair-trigger you might have problems.
I just finished the video and will get to the writeup as soon as I can.
Why do a Trigger Modification?
The Ruger 10/22 comes with a pretty stiff trigger pull- It's about 7-8 lbs. When most people squeeze the trigger they have a tendency to pull the rifle off target.
In this tutorial I will show you how to lighten or reduce the trigger pull down to around 3-4 lbs. This will help most people become more accurate when shooting. All the parts in this tutorial are stock parts or parts that came with the rifle. It will only require tools that most people already have and take about 30min worth of work.
If you're looking to build the ultimate competition rifle, then an after market trigger might be a good idea- They usually lighten the trigger's pull weight or make it adjustable, as well as tighten up the tolerances with shims and etc. You can find some really nice after market triggers out there for around $60. However, if you're like me and are trying to balance cost with benefit then the trigger job in this video will give you the best bang for your buck.
Getting Started
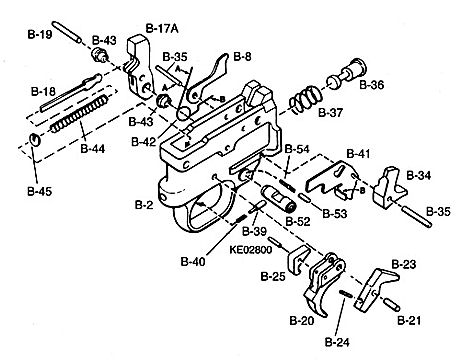
Anytime I work on something that I'm not to familiar with I try to find a diagram of how it goes together so I can reassemble things once I've taken them apart. Here is an exploded diagram of the Ruger 10/22's trigger assembly or trigger group. You might want to print this out to use as a reference.
After making sure your gun is not loaded, remove the take-down screw and barrel band; then remove the action/barrel from the stock.
.jpg)
Remove the trigger assembly from the action/reciever.
.jpg)
Now dismantle the trigger assembly
.jpg)
What we are trying to accomplish?
Here is a look at how the hammer and seer contact and interact with one another.
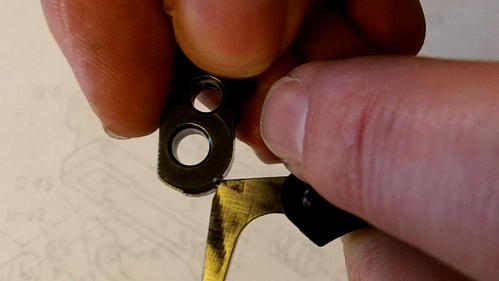
In the picture below you can see that I've drawn a picture of the seer and hammer. I have also drawn a line where the seer contacts the hammer. This shows that I am going to remove a small portion of the seer at this contact point.
.jpg)
Below you can see where the tip of the pencil is, if you draw a line straight down from this point you will see the area that needs to be cut off the hammer in order to lighten the trigger's pull weight. Buy removing this portion of the hammer and the small portion off the seer's contact point, we will reduce the amount of friction it takes to fire the rifle. In other words the more friction between the seer and hammer the heavier the trigger's pull weight will be, while less friction means less pull weight.
.jpg)
Working the Hammer and Seer
Now I am going to use a sharpening stone to grind down the areas that I showed in the drawings above. You can probably use a piece of sandpaper for this but I think the sharpening stone produces a superior result. I am using a diamond sharpening stone made for sharpening knifes. It cost $6 at the local sporting goods store. It works great and cuts parts down fast.
Note: Be careful not to take too much off the hammer and seer in the first feww passes. You're going to want to take a little off of both the seer and hammer and then test it out. So go easy when you're doing this.
.jpg)
I like to start on one end of the stone and run it straight back to the other side.
.jpg)
If you're having a hard time identifying whether or not you are grinding straight, use a sharpie to mark the area that you are grinding.
.jpg)
Take a couple of passes over the stone to grind away the black ink.
.jpg)
Using your eyes... look to see if the top of the hammer and the grinding to ink transition line is parallel to one another. In the picture below you can see that my grinding line is not parallel to the top/bottom of the hammer and that the tapering line slopes downward toward the tool I'm pointing with. This means that I need to do a better job of keeping the hammer straight when grinding it on the sharpening stone.
.jpg)
Now that I've taken a bit off the hammer and staightend the grinding line out, I'm going to grind down the seer's contact point.
.jpg)
.jpg)
Preliminary Trigger pull Testing
Now that I've taken a bit off the seer and hammer's contact points, I am going to reassemble the trigger, seer, hammer, hammer spring, and the pins into the trigger guard or housing that holds the trigger assembly/group together. There's no need to reassemble the whole trigger assembly with all it's parts to test the trigger's pull.
Here is a little trick that will speed up the trigger reassembly process. I've got a piece of weed-whacker line that I use to pre-assemble the trigger before putting it into the trigger guard.
.jpg)
.jpg)
The weed-whacker line holds the trigger and seer together while putting the parts back into the trigger guard.
.jpg)
Now just take the pin and push the weed-whacker line out.
.jpg)
Now that the main parts are put back together, pull the hammer back and pull the trigger. If the trigger pull is still heavier than you want it to be dis-assemble the assembly for more grinding work.
.jpg)
More Hammer and Seer Adjusting
Here I am working on the seer by grinding a little more off the seer's hammer contact point.
.jpg)
I've taken more off the hammer and you can see that there is a substantial amount of the hammer's contact point removed now. Sorry it's not a better picture.
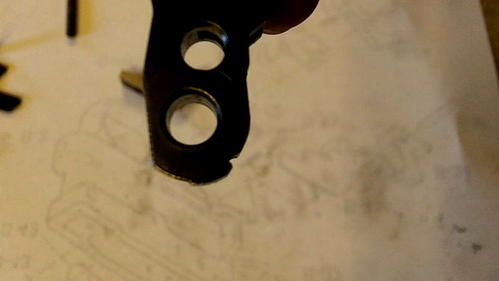
Here is a better look of where the hammer has been ground down.
.jpg)
I'm going to clean things off with a little gun cleaner/lube for the next test.
.jpg)
I reassembled the parts for the next pull test and surprisingly it feels perfect!
I was able to get the right amount of pull on the second try, but if it takes you a bit longer don't fret, just take a little off at a time and you'll eventually get there.
.jpg)
Cleaning and polishing the Trigger parts
The areas that I've just grounded away are a bit rough and where I'm pointing is where the hammer contacts the seer during operation. So I am going to pollish this rough spot down before putting the gun back together again.
.jpg)
First I will use some 600 grit sandpaper and then move to 1,000 grit. You don't have to work it too much, just enough to make it smooth to the touch.
.jpg)
In the picture below you can see that I've smoothed the area out so there are no hard lines. Now it is ready for polish.
.jpg)
I just used a cotton rag and some polishing compound to give the hammer a little bit more smoothness.
.jpg)
Testing the Trigger for Misfires and Safety Effectiveness.
After reassembling the rifle, pull the bolt back hard, put the safety on safe, and then pull hard on the trigger. If the safety is working properly and the hammer doesn't fire it is a good sign that you did everything correctly and can move on to the next test. However, if the hammer fires while the safety is on you've probably over-worked or over ground the hammer and seer. I'm not going to cover fixing the problem in this tutorial but basically you have to go back to the hammer and seer and increas the size of the contact points again. This is done by grinding the points back into the hammer and seer. The alternative fix is to buy an aftermarket trigger and install that into your rifle.
.jpg)
If you safety checks out, pull your bolt back hard and test the tigger out. Do it about 10 times and if you feel good about what you've just accomplished, you're done!
.jpg)
let me know if you have any comments or questions about this tutorial you can email me or write a comment below.