{metacanonical:http://theprojectjunkie.com/bicycles-bike-components/carbon-fiber-bike-frame-repair-2-tape-wrap-alternative.html}
Carbon Fiber Bike Frame Repair 2- Tape Wrap Alternative
Before the Repair
.JPG)
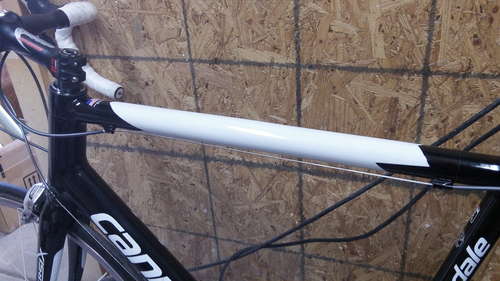
After the Repair
.JPG)
Introduction:
The following tutorial is kind of an extension to the other frame repair tutorial that I did. If you'd like to see it, here is the link: Carbon Fiber Bike Frame Repair.
This is a toptube puncture to a Cannondale Super Six road bike frame. I created this short tutorial to illustrate that carbon fiber repairs can be made without an expensive vacuum system.
In this tutorial I will demonstrate how to use common masking tape to compression wrap the carbon fiber splint to the frame. This method is quite effective and almost anyone with some common sense can do it.
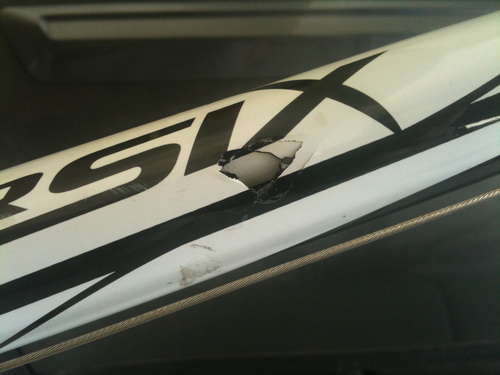
Evaluate the Damage
Here you can see that I drilled two 1/8" holes in the toptube near the puncture. The holes are made to determine the wall thickness of the top tube at the point of the repair. From here I will try to match the carbon fiber's thickness to about 100 to 150%.
.JPG)
.JPG)
Masking the bike
I masked off the bike before the repair leaving the repair area is exposed.
.JPG)
.JPG)
Sanding Off the Paint
I needed to expose the damage and this puncture was a lot worst than I thought. I used 120 grit sand paper to remove the paint and was careful not to sand too much of the existing carbon fiber away. The inner fracture of the puncture was the size of this whole. It was big enough to allow me to reach my finger inside and feel around.
.JPG)
.JPG)
First layer of carbon fiber
Here is the first layer of carbon fiber or the 80k Uni. I made a prepreg of the uni and was careful not to wrap the tape too tightly around the splint over the tubes hole.
.JPG)
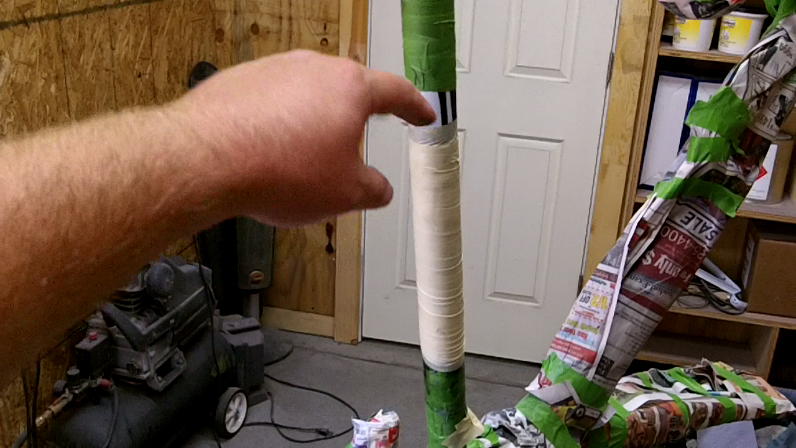
I didn't do a very good job documenting the process so I went back and used a piece of PVC tubing to demonstrate on.
*Important Note on Epoxy HDT*
Something to consider when choosing an epoxy is the Heat Deformation Temperature (HDT). Epoxy HDT is how hot the cured epoxy can get before it starts having a "softening effect" or looses it's stiffness. Most bike manufacturers use epoxies with a higher HDT then the stuff commonly used by use more common folk. If you are planning on painting your repair black, another dark color, or leaving it nude you may want to consider an epoxy with a higher HDT.
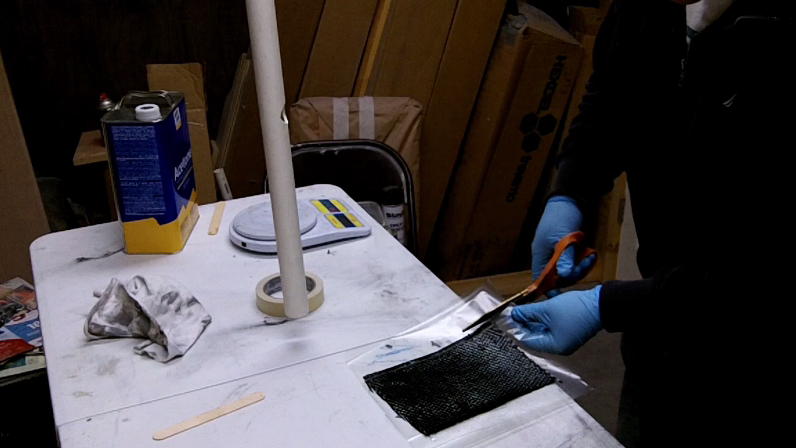
On this repair I used Resin Research 2100 epoxy with fast hardener- It's physical properties are very similar to West Systems 105 resin system- however, Resin Research is a bit thicker in viscosity. West Systems and Resin Research both have HDT's in the 125 to 140 deg F range. This temperature can easily be reached by leaving your frame in the hot sun or in a hot vehicle.
On this repair I am using a white paint over the repair wich helps keep the repair from reaching higher tempatures.
Here I'm wetting out some carbon fiber with epoxy to create a prepreg splint. On the actual frame I used 80k uni for the first layer of of the splint.
.jpg)
Next the excess plastic needs to be cut off the prepreg so the plastic only covers the carbon fiber.
.jpg)
Now you just wrap the splint around the tube where the hole or damaged area is on the frame.
Note- Be careful that your plastic and peelply aren't laminated into your wrap. In other words your wrap will create a seem (running lengthwise of your tube) where the wrap overlaps itself. Make sure you peel your plastic and peelply back a bit so that it doesn't get laminated between the carbon fiber at the overlap/seem. You want a carbon fiber to carbon fiber seem, and then the peelply and plastic can overlap themselves. The peelply and plastic will be removed after the epoxy has cured.
In the picture below you can see me pulling back the plastic so that it doesn't get laminated between the layers of carbon fiber.
.jpg)
.jpg)
To help prevent the carbon fiber cloth from bulging or sinking in where the hole or repair is, I like to run some strips of tape lengthwise of the tube before doing the spiral wrap.
.jpg)
Be careful not to wrap around the tube where the hole is. If you do this too tight you will cause an indentation or dent in the splint where the hole is. You want the splint to match the existing tube as best as possible on this first layer so be careful.
.jpg)
Here is a look at the first wrap and layer of carbon fiber on the actual frame.
.JPG)
Here is a look at the uni carbon fiber after removing the tape and after a light sanding. I used 120 grit sandpaper and tapered the carbon fiber wrap on the ends to get a nice transition from the tube to the splint. I was careful not to remove too much carbon fiber where the hole/repair was.
.JPG)
Second Layer of carbon fiber
Again I made a prepreg. This time I used 1 layer of 6k oz 4 harness satin weave oriented at +/- 45 to the tube. I also used 1 layer of peelply (you don't need peelply but I like to use it) and then 1 layer of plastic. You should also know that this second layer of carbon fiber is about 1" longer on both ends than the first layer of carbon fiber.
Note: You don't have to use peelply for this tape wrap to work out. However, you'll need to lightly sand between the carbon fiber layers and also lightly sand the final layer of carbon fiber so that the filler will stick to the repair- Epoxy and filler does not bond well to shinny surfaces. If you do decide on using peelply you don't need to sand before adding the filler. I think it's best to add the filler first and then sand to blend the repair into the existing frame. I'll show you more later on in the tutorial.
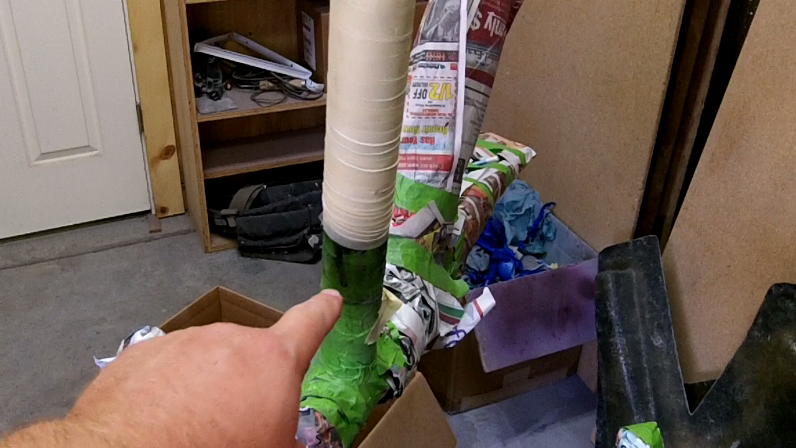
I started the tape wrap at the top of the tube where my finger is pointing in the picture below. I then spiral wrapped the prepreg to the existing tube and first splint layer.
You don't need to worry about causing a dent where the whole is on this layer so give this layer a fairly tight wrap. I gave did 3 spiral wraps on this last layer. I started at the top and worked my way down on each wrap.
Here you can see some excess epoxy running out of the wrap- This is a good thing. It means we're squeezing out excess epoxy and getting a good carbon fiber compaction on our splint.
Here is a look at the second layer of the carbon fiber splint. The mat finish is because I used peelply. If you didn't use peelply it will be shinny.
.JPG)
.JPG)
Filling the Carbon Fiber Splint
The "pink" color you can see in the picture below is the filler that I used on this repair. Again, I like to apply filler before sanding so that I get a nice blend without sanding too much of the carbon fiber splint away. The filler I used was just some 3M Professional Glazing putty- It's like Bondo but thinner.
.JPG)
Painting the Repair
Here I used some primer to hide some of the "flashing" or color changes that would happen if I just painted this repair with base coat. Primer is also nice because it shows you if there are any other spots that still need to be filled.
.JPG)
I went to the automotive supply store and picked out a color of white that looked closest to the other decals. I wanted to paint the repair black but the bike's black paint has a bit of pearl flake to it. It looked like it would be too hard to match so I settled for the white.
You have a couple choices at this point you can attempt to match the original decals and graphics or you can create something unique. I did something in between on this repair. I used the original decals as reference points to paint the repair. I was surprised to find that the decals were applied crooked on the frame. Of course this was after I painted so my paint job came out a bit off-center as well. I don't think it is enough to be noticed by others but I'm somewhat of a perfectionist and knowing bugs me. LOL
.JPG)
.JPG)
After the base was applied, I used some urethane automotive clear coat to give the repair a tough and glossy finish.
.JPG)
.JPG)
The finish looks great with exception to the little lines where the new clear coat was added. I thought about wet sanding these lines down but was worried I'd do more damage than good. I was also afraid that the paint would chip off if I had spray blended in the clear. The lines really just look like I added a really long clear sticker to the frame. From a few feet away you can even notice them.
.JPG)
.JPG)
.jpg)
.jpg)
.jpg)
My friend has ridden this frame several times now and it's been a few months since the repair. He says he can't feel a difference in the way the bike handles and that the repair is still holding up great- If this changes I'll post an update.
If you'd like to see the other frame repair tutorial that I did, which shows a similar but different process, click on this link: Carbon Fiber Bike Frame Repair
Let me know if you have any comments or questions.